Ready to discover how the Shopify dashboard works?
In this blog, we will talk about this interesting leading e-commerce platform. But before we get into details about the dashboard, let me briefly tell you what Shopify is.
Table of Contents
Shopify
Master Shopify and take your business to the next level

It's a place where your entrepreneurial dreams meet digital reality. That's Shopify . It is an e-commerce platform that allows you to create and manage your own online store in a simple and efficient way. From the first business idea to the moment your products reach the hands of satisfied customers, Shopify supports you throughout the process.
I will also tell you about the wonders of a control panel that has everything, from the start to the preferences. Yes, that's right, Shopify is not just an e-commerce platform; It is the perfect ally to grow your online business.
The Power of the Shopify Dashboard
The Shopify control panel is your operations center to manage everything related to your business on the platform.
After signing in, you'll be able to bring your store to life, customize settings, and perform all the essential tasks for efficiently running your Shopify business.
The Shopify dashboard is designed to be intuitive and easy to use, even for those without technical experience.
Merchants using Shopify can access the dashboard from anywhere with an internet connection, making it easy to manage your online store from any device.
Use the Shopify control panel and start building your success

Some of the key functions that can be performed from the control panel include:
1. Home

Where it all begins
Shopify Home isn't just one place, here you'll find a quick overview of trends, important alerts, and shortcuts to key areas of your store.
2. Orders

Efficient order management is crucial to the success of any business. Shopify offers a robust platform that makes this process easy, from order placement to fulfillment.
These are the essential steps to maximize efficiency and boost the growth of your business.
1.Placing Orders
After a customer places an order through your sales channels in Shopify, it is automatically registered in the Orders area of your store. Additionally, the flexibility of creating draft orders manually allows you to easily manage transactions made outside the platform.
Tip: Use Shopify Shipping to streamline the process of purchasing and printing shipping labels right from your dashboard, saving time and operational costs.
2. Order Fulfillment
It is a crucial process of preparing and delivering the products requested by your customers. It includes steps such as picking and packing products, labeling the order for shipping, and finally shipping the package with a courier service.
Tip: Set up order fulfillment for your store using the steps provided by Shopify, and customize to fit your business's specific needs.
3. Compliance Methods
When adding products to your store, select the appropriate fulfillment method. You can choose to fulfill your own orders, use third-party fulfillment services, or combine both methods depending on the origin of the products ordered.
Fulfill your own orders: Ideal for new or small businesses looking for a cost-effective method and want to maintain control over packaging.
Fulfillment Services: Efficient for large businesses, these services store, package, and ship products for you, saving you time and potentially being more profitable.
Tip: Integrate fulfillment services through apps that sync with your Shopify admin, allowing you to make changes and updates from one place.
4. Automatic Compliance vs. Manual
After setting up your fulfillment methods, choose between automatic and manual fulfillment. The choice will depend on the nature of your business and the products you offer.
Manual Fulfillment: Perfect for businesses that handle custom products, pre-orders, or want to offer partial fulfillments without immediate refunds.
Automatic Fulfillment: Ideal if you sell digital downloads or use fulfillment services for all your products.
Tip: Adjust your order processing settings to your needs, making sure you maintain control over orders that require physical packaging and shipping.
5. Assignment of Compliance Methods
When adding or editing products, assign the corresponding fulfillment method. This allocation may vary depending on the storage locations and fulfillment applications you use. With everything set up, you can now start fulfilling your orders.
Tip: Manage inventory efficiently, considering multiple locations and fulfillment applications for detailed control.
Drafts

In the world of e-commerce, efficiency in order management is key. With Shopify, creating draft orders becomes a strategic tool to simplify and enhance your transactions. Let me guide you through this process step by step.
What are Draft Orders in Shopify?
They are a powerful feature that allows you to anticipate your customers' needs, create orders quickly and efficiently, and optimize the entire purchasing process. From accepting payments over the phone to managing B2B transactions, order drafts are your ally in the world of e-commerce.
Draft orders may contain the following information:
One or more products
Discounts on individual items or the entire order
Shipping rates
Applicable taxes
A client
Tags
Market
Shipping labels

Shopify Shipping
Shipping is an essential part of any online business, and on Shopify, having the right tools can make all the difference. With Shopify Shipping, you can simplify your shipping process and take advantage of a number of benefits that will boost the efficiency of your business. Below, we'll explore shipping labels in detail and how you can make the most of this feature to improve your customers' experience.
Connect your shipping world with shopify shipping: benefits and key features
1. Buy and print labels directly from your shopify admin
Shopify Shipping makes it easy to manage your shipments by allowing you to purchase and print shipping labels directly from your Shopify admin panel. This direct integration simplifies the process and saves you time, ensuring your packages are ready to ship efficiently.
2. Discounted Rates for Shipping Labels
Who doesn't appreciate a good discount?
With Shopify Shipping, get discounted rates when you purchase your shipping labels. Save on shipping costs and improve your profitability, allowing you to offer competitive shipping options to your customers.
3. Shipping rates calculated for a transparent experience
Give your customers a transparent shopping experience by displaying calculated shipping rates instead of flat rates at checkout. Not only does this provide clarity on costs, but it can also increase customer confidence by displaying accurate and up-to-date pricing.
4. Available to businesses with eligible fulfillment locations
It's essential to note that Shopify Shipping is available to businesses with eligible fulfillment locations. Make sure you meet the necessary requirements to get the most out of this tool and optimize your supply chain.
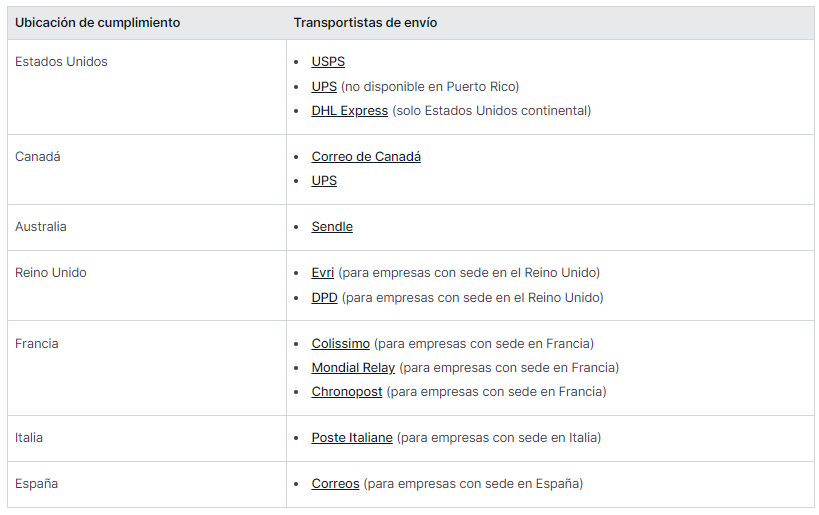
Carrier Options in Shopify Shipping
Using Shopify Shipping, you can connect with a variety of carriers to meet your specific shipping needs. Each carrier has its own policies, resources and requirements, so it is essential to understand these details to avoid potential delays or unnecessary fees. Here are some popular options:
- Shopify Shipping with UPS
- Shopify Shipping with DPD
- Shopify Shipping with USPS
- Shopify Shipping with DHL Express
- Shopify Shipping with Canada Post
- Shopify Shipping with Evri
- Shopify Shipping with Sendle
- Shopify Shipping with Chronopost
- Shopify Shipping with Colissimo
- Shopify Shipping with Correos
- Shopify Shipping with Mondial Relay
- Shopify Shipping with Poste Italiane
Tip: Take advantage of Shopify Shipping's ability to display accurate delivery dates at checkout. Includes both processing time and
abandoned carts

How can you make sure those abandoned orders don't fall through the cracks?
When a customer abandons their cart, the selected items disappear. However, abandoned cart recovery is possible through specific channels. Shopify allows you to implement this strategy in the online store, the buy button sales channel, and the Plus wholesale channel. Importantly, this tactic does not apply to abandoned orders in Shopify POS or external channels.
Here I present effective strategies to recover these valuable transactions in your Shopify store.
Review abandoned orders
The key to improving conversion rate is understanding why customers abandon their carts. Shopify makes this process easier by allowing you to review abandoned orders in your dashboard. Orders are archived for three months, and it is crucial to note that, on a weekly basis, those older than three months are automatically deleted.
Payment events from an abandoned order
Each payment attempt leaves a mark on the abandoned order timeline. This feature provides detailed information about payment events, being especially useful if a customer experiences problems during the payment process. Take advantage of this tool to provide proactive assistance to your customers.
Automatically send an email to a customer with a link to their abandoned order
If you're looking for a more dynamic approach, turn on email automation in the Marketing section of your dashboard. This allows you to send personalized emails to customers who have abandoned their carts. Each message contains a direct link to the abandoned cart, providing customers with the option to complete the transaction.
It is essential to take into account some situations in which automatic recovery of abandoned orders is not performed, such as multiple carts abandoned by a customer before the purchase, payment processing errors, shipments not supported to the customer's address, among others.
Automation settings
Customize email automation to your preferences. From the settings panel, choose who to send the emails to and set the time interval for sending them. The default intervals are carefully selected to maximize recovery chances, but you can always adjust them based on your store's specific needs.
Tip: A foolproof strategy to motivate customers to complete their payment is to offer attractive discounts. This tactic not only adds value to the transaction, but can also be the key to closing the purchase.
Manual intervention a personalized touch
If you prefer a more direct approach, you can always manually send a customer an email with a link to their abandoned cart. This is especially useful if automation is not set up or if a customer personally requests the link.
Abandoned Orders Email Report
Shopify gives you a detailed report on abandoned cart emails. This resource allows you to evaluate the effectiveness of your campaigns, showing you key data such as sessions generated, orders completed, conversion rates and more. Use these insights to continually refine your recovery strategy.
3. Products

Effectively organizing your products is key to ensuring that your customers find what they are looking for easily. In Shopify, you can enhance this experience using collections. These not only simplify navigation for your customers, but can also boost sales by highlighting relevant products.
The magic of the products begins here. Add, edit, organize. It is your virtual warehouse. Attractive photos, captivating descriptions, all in one place.
Here I detail how to make the most of the collections in your online store.
How to maximize the potential of your online store through efficient product management in Shopify. From initial loading to package creation, the following key areas are met:
Product Management: Intuitive platform to add details and upload images. Ability to create variants for options such as size or color. Marking products as available in various sales channels.
Centralized Organization: Control panel that allows you to easily view, add, update and organize products and variants.
Custom Fields: Adding specialized information or files through metafields.
Customizing product pages with themes like Dawn.-
Update Products: Simple process to update information such as price and availability. Added custom fields connected to Online Store 2.0 themes.
Business Growth: Option to hire a Shopify Partner for specialized assistance.
Product Bundles: Effective strategy to increase order value and deliver curated value. Passing on discounts, removing old inventory, and increasing product visibility.
Collections

1. Creating Collections: The Key to Efficient Organization
Collections allow you to group products in a logical and attractive way. Here are some examples of collections you can consider:
Clothing for men, women or children.
Items of a specific type, such as lamps, cushions or rugs.
Items for sale.
Items of a particular size or color.
-
Seasonal products, such as Christmas cards and decorations.
Tip: Increase Sales with Product Recommendations.
Do you want to boost your sales even more?
Consider adding a recommended products section to your online store theme. This not only provides personalized suggestions to your customers, but also improves the visibility of specific products.
2. Presenting Your Collections: Design and Navigation
An effective way to highlight your collections is to add a “recommended products” section to your online store design. This not only provides customers with personalized suggestions but also promotes additional products, thus increasing cross-selling opportunities.
3. Presentation of Collections in your Online Store
Once you've created a collection, you can display it in your online store as a dedicated web page with a visually appealing gallery of the included products. Make browsing easier through strategically placed links in your store navigation.
The exact layout of these pages will depend on the theme of your store, making sure the presentation is consistent with the overall aesthetic of your brand.
4. Types of Collections: Automated vs. Manuals
A. Automated Collections:
This type of collection uses selection conditions to automatically include products that meet certain criteria. This is particularly beneficial if you have a wide variety of products or if you handle seasonal inventory. Automation saves time as future products that meet the conditions are automatically added to the collection.
Labeling is key here. For example, in a clothing store, labeling products with seasonal terms such as "summer" or "fall" will allow them to be automatically integrated into the corresponding collections.
However, a disadvantage is the difficulty in removing specific products without adjusting the collection conditions.
B. Manual Collections:
These collections include only the products that you manually select. Although they require more work to maintain, they are ideal for small collections or specific sales events. If you are planning a flash sale on a few products, a manual collection allows for personalized selection and the application of exclusive discounts.
Importantly, after creating a collection, you cannot change its type, so the choice between automated and manual should be based on your needs and long-term strategies.
5. Strategies for Business Growth
If creating and managing collections seems overwhelming, considering hiring a Shopify Partner can be a valuable option. These experts can guide you through the process, ensuring your collections are set up effectively to drive the growth of your business.
Collections are a powerful tool to organize and highlight your products effectively. Harnessing your potential can make all the difference in the customer experience and, ultimately, the success of your online store.
Inventory

Inventory Management with Shopify
In the world of commerce, having effective inventory control is crucial to the success of your business. At Shopify, we offer you advanced tools to manage your inventory efficiently and keep your business on top.
Here we highlight the key points to make the most of these features:
1.Inventory Tracking: Avoid out-of-stock situations through the robust inventory tracking system.
Easily access settings and history from the Inventory section.
2.Simple Configuration: Simplification of the configuration process for fast and effective tracking.
3.Detailed Reports: Analyze fluctuations in inventory levels through the Inventory Reports section.
4.Instant Alerts: Don't miss the sales opportunity due to lack of stock, install alert applications from the Shopify App Store to receive direct notifications about low levels.
5.Efficient Export and Import: To manage inventory in Shopify POS, you can export and import quantities using a CSV file, it contains unique information that identifies products and variants.
6.Selling out of Stock: In Shopify, a product is considered out of stock when its inventory is zero, and the purchase of out of stock products is not allowed, this setting can be changed. If a product is out of stock at a location without online inventory but is in stock at another location, inventory must be added to the location that processes online orders. Purchases of out-of-stock products may be allowed for various reasons, such as pre-orders.
7.Inventory Tracking Setup: Inventory accuracy on Shopify is essential to the shopping experience. Before managing inventory levels for a product, you need to set up inventory tracking for that particular item. Once activated, you can access the product's inventory history, spanning the last 90 days.
8.Multi-Managed Inventory: If you are using a fulfillment application that manages inventory in multiple ways, it may be necessary to make adjustments to the settings of the products stored in your store locations before updating inventory quantities.
9.Manual Adjustments and Bulk Editing: We understand that needs change, so here are some tips for manually adjusting: Easy inventory tracking and adjustment on the products page.View the inventory of products and variants on the Inventory page.Change, Hides and reorders columns for a custom view.
10.Inventory Transfers: Optimize inventory management between different points of sale through the use of transfers. With this tool, you can register, track and receive products, maintaining an organized system.
11.Adjustment History: Explore history to understand recent changes and ensure accurate inventory tracking.
Purchase orders

A purchase order is a document that details the products, prices and quantities that a business requests from a supplier. In addition to facilitating the transaction, purchase orders help you keep detailed track of inventory, costs, payment terms, and arrival times.
Purchase Order Creation Process
It involves selecting suppliers, products and variants, as well as providing additional information such as estimated arrival dates and tracking numbers. The order can be saved as a draft before being marked as shipped, which updates the incoming inventory.
Supplier Management
Includes the option to add, edit and delete supplier details. Purchase orders can be edited at any time, and can be exported as PDF files to send to suppliers.
After receiving physical products, inventory can be marked as received, and quantities received can be adjusted. It details how to manage purchase orders in different states, such as closing an order after marking it as shipped or deleting a preliminary order.
It gives you information about inventory calculation, highlighting the importance of understanding how items are counted and tracked when receiving a purchase order.
Transfers

Transfers are a powerful tool for managing the movement of inventory between store locations. You can record, track and receive incoming inventory, keeping everything organized.
Wondering how you arrived at a certain inventory adjustment?
Browse your settings history for details on recent changes.
Enable inventory tracking: Make sure you keep accurate track of your inventory by enabling the tracking option in Shopify. Additionally, you can allow the sale of out-of-stock products if you wish.
Create an inventory transfer: If you manage multiple locations, transfers are essential. Learn how to create inbound transfers to maintain efficient inventory flow.
Receiving an inventory transfer: Once your inventory arrives, receiving the transfer is crucial. Learn to accept or reject items to keep your inventory accurate.
Calculate inventory and undo transfers: Understanding how items are counted and how to undo incorrect actions is vital to maintaining the integrity of your inventory.
Gift cards

Gift cards on Shopify are a versatile tool available on all subscription plans. You can sell them as products in your online store or share them on social networks. Customers can receive them as rewards or incentives.
Steps to Sell Gift Cards
Activate the feature from your Shopify admin.
Create or update gift card products.
Enter details such as title, description, image, and names.
Configure availability in sales channels and set a publication date.
Featured Features
In-Person Sales: Use the Point of Sale channel to issue physical or digital gift cards.
Expiration Settings: Decide if gift cards expire and customize the expiration date.
Apple Wallet Passes: Offers customers the option to store gift cards in Apple Wallet.
-
Gift Card Discounts: Create specific discounts for gift cards, either by percentage or fixed amount.
Issuing Free Gift Cards: You can generate free gift cards as promotions.
Management and Use of Gift Cards
Management from the Control Panel: Organize, filter and edit issued and purchased gift cards.
Redemption in Sales Channels: Customers can use gift cards in the online store, Shopify POS, and other channels.
Resend and Export: Customers can resend lost cards and you can export information to a CSV file.
Refunds and Deactivation: You can apply refunds to gift cards and they are automatically deactivated.
4. Clients

The customer system in Shopify allows you to manage customer information for an online store efficiently. Every time a new customer places an order, their name and details are added to the customer list. Customers can be managed and segmented based on similar characteristics for effective communication.
Customer Management
Includes sending emails, editing profiles, adding notes and tags to organize the list. In addition, you can also edit subscription payment information and merge duplicate customer profiles, with specific considerations and limitations.
The system allows you to send emails to clients, edit profiles individually or in bulk, merge profiles and delete personal data of clients according to privacy policies. Customer lists can also be exported and imported using CSV files, and information on setting up and managing customer accounts is provided.
Improve Customer Experience
I suggest providing services such as clear policies, informational pages in the online store, email newsletters, and strategies to encourage customer interaction. Today the importance of offering excellent customer service, resolving problems effectively and rewarding customer loyalty is highlighted. Shopify Inbox makes it easy to manage customer messages via online chat.
Segments

Customer segments in Shopify allow you to group customers with similar characteristics for more effective management. They are created in the "Customers" page editor using filter names, operators, and values. Additionally, Shopify offers pre-defined segments that can be adapted or used as a basis for new segments.
Use the editor to create customer segments
The editor makes it easy to create segments by providing filter, operator, and value naming options. If you need assistance, you can hire a Shopify Partner to help you. Once created, segments are updated automatically.
New customers who meet the criteria are automatically included, and if a customer meets multiple segments, they may be in more than one. When an existing customer no longer meets the criteria, they are automatically removed from the corresponding segment.
5. Content

Metaobjects
In Shopify meta objects are key tools for adding and storing additional structured information in a store. They may contain data such as product features, specifications, and size charts. Information about meta objects is handled through the Shopify admin, the Meta Objects API, and can also be accessed through Liquid and the Storefront API in themes.
Building a Metaobject
To build a new meta object, you must access:
Content > Meta Objects or Settings > Custom Data in Shopify Admin.
You specify the name, choose the type, and define the fields with details such as description, type, and validation rules.
Entries can then be added to the meta object.
Delete a Metaobject
Deleting a meta object should be done with caution, as it also deletes all associated entries. Before deleting a meta object, it is important to ensure that it is not connected to blocks or sections in the live theme.
Reference Metaobjects
Reference meta objects in specific parts of Shopify, meta field references can be created. This allows a meta object, such as "Product Features", to be used in areas such as product pages by creating specific meta fields.
Viewing Metaobjects
In the online store it depends on the theme used. Online Store 2.0 themes support connecting meta objects through the theme editor, while older themes may require editing the theme code. The connection is made through blocks that support dynamic fonts.
When adding meta objects, you may encounter limits on the number of blocks that can be added, depending on the section and block type. If limits are reached, it is necessary to adjust the settings or remove unnecessary blocks.
For those with coding experience, the option is provided to edit the theme code to display meta objects in various parts of the online store. If you need assistance, it is recommended to hire a Shopify Partner from the Shopify Partner Directory.
Files

The Files page in Shopify Admin makes it easy to upload, manage, and delete essential files for your store. These files can include images, videos, client downloads, and items connected to metafields.
When uploading files, it's important to adhere to the specific file format requirements based on your plan. Different elements of the store support certain formats, so it is essential to review the limitations. Searching and filtering files is simplified with options such as the search bar, file size and type drop-down menu, and the ability to filter by file reference. Additionally, you can save filter views for recurring shortcuts.
File sorting can be adjusted based on addition date, size, or alphabetical name. You can also make a file available for download and manage digital downloads using the Digital Downloads app.
Additionally, file editing is easily done from the Files page, with modifications applied everywhere the file is used in the store. For more advanced actions, such as deleting files, additional information is provided to ensure efficient and hassle-free management.
6. Finance

Show a summary of your sales, including total revenue, returns, and refunds.
Revenue: Provides information about your revenue, broken down by sales channel, geographic location, and traffic source.
Expenses: Allows you to track your business expenses to get a complete view of your operating costs.
-
Credit: Shopify offers financial services, such as Shopify Capital, which is a financing program for merchants. You can check if you have financing offers available and manage financing from this section.
Payments
Here you can view and manage payment transactions made in your store. You can review pending payments, refunds, and any other transaction-related issues.
Bill Payment
Shopify offers the ability to pay invoices directly from the control panel. You can manage your outstanding invoices and make payments as needed.
It is important to note that the specific features and layout of the dashboard may vary depending on the version of Shopify you are using and the updates made since my last update in January 2022. For more detailed and up-to-date information, I would recommend visiting the official website Shopify or contact Shopify support.
7. Analytics

Unlock the heart of your online business through the Reports and Statistics page in Shopify, where key data about sales, orders and visitors is presented clearly and accessible. With a single glance, evaluate your store's performance across multiple channels and time periods.
What can you do on the Reports and Statistics page?
Check recent sales and compare them with previous periods.
Evaluate the performance of your sales channels.
Track average order value.
-
Discover where your visitors come from by region or social media source.
Monitor trends over time.
The dashboard offers valuable metrics in numerical and graphical formats, with the ability to display percentage changes relative to previous date ranges.
How to Use the Reports and Statistics Page
From the Shopify admin, navigate to Reports & Insights.
By default, data from the current day is presented compared to the previous day.
Customize the date range to your needs, choosing from preset options or setting custom dates.
For comparisons, turn on the "Compare to previous dates" option and select a comparison value.
Edit the metrics displayed in your dashboard according to your preferences.
Click "Apply" to save the changes.
Keep in mind that some metrics may require a plan that supports detailed Shopify reporting.
-
Explore the Reports and Statistics page to get more detailed information about your store's performance and customer behavior.
Important notes:
The data is updated in approximately one minute when you open the page.
Sessions and visitors are cookie-based, with a session ending after 30 minutes of no activity.
Data comparisons may vary slightly between the dashboard and other analytical tools.
Adjust and filter reports according to your needs, exporting them for deeper analysis.
Boost your business strategy with Reports and Statistics in Shopify, giving you the essential information to make informed decisions and boost the growth of your online store.
8. Marketing

Measure and Master your Marketing
Do you want to take your business to the next level?
With Shopify, you can evaluate and boost your marketing efforts effectively. From your control panel, the Marketing section offers key data to drive your strategy:
📈 Marketing Summary: Track key indicators over time to evaluate your performance
🌐 Marketing Channels: Analyze sales results, sessions and more, categorized by specific channels.
🚀 Marketing Activities: Filter and examine your most recent campaigns to optimize your strategy.
To enter this data, go to the Marketing page in your Shopify dashboard. Please note that it may take up to 24 hours for metrics to update.
Traffic and Conversion Reports
You want to know more about your store traffic. Shopify offers you detailed reports:
- 📊 Main Traffic Sources: Discover the main traffic sources by sessions, orders and more
- 🗺️ Locations with the Most Traffic: Know the geographical areas highlighted by sessions, orders and conversion rate.
- 🛍️ Online Store Conversion: Visualize the customer's journey, from arrival on the site to conversion.
Optimize your strategy by sorting and filtering data according to your needs.
Sales and Order Attribution: Understand the Impact of your Marketing
In the Marketing Summary, find out how many sales and sessions are attributed to your activities. Access detailed reports to better understand:
- 📊 Main Channel Performance: Analyze the five main channels and their details.
- 📈 Channel Performance: Explore conversion results over time.
- 📅 Marketing Activities Report: Review recent activities to adjust your strategy.
Use attribution models to understand the customer journey and make informed decisions.
Create marketing automations in Shopify
These innovative automations, powered by Shopify Flow, give you the freedom to customize your approach in two key ways: through pre-built templates offered by Shopify Email or external apps, or by creating your own custom automations. This functionality is available for stores on the Basic Shopify plan or higher.
Tip: When deploying multiple automations, consider how they will interact with each other. Avoid saturation of your audience. For example, by activating two welcome emails, make sure you don't inundate your customers with twice as many messages.
How to Create Your Own Automation
From the time of an abandoned cart email to the specific interval after a customer leaves their cart, the options are yours to adjust. After setting up your masterpiece, you can activate it immediately or save it as a draft. Don't forget that to edit the workflow, you must use a desktop device.
Make every click count, discover more in the Marketing section, and take your strategy to the next level with Shopify.
9. Discounts

In e-commerce, discounts are not only a strategy, they are a powerful weapon. Wondering how to increase your sales on your Shopify store? The answer is to offer irresistible discounts. And at Shopify, versatility is key.
Variety of Discounts
Whether it's creating discount codes, setting up automatic discounts, or setting sales prices for specific products, you're in control. You can design codes for dollar discounts, percentage discounts, buy X get Y, even free shipping! And best of all, your customers can easily redeem them at checkout online or in person using Shopify POS.
Simplified Management:
From the Discounts page in your Shopify admin, you'll be able to update and manage all of your existing discounts. But attention! Before making changes, check to see if another team member is making adjustments to the same discount.
Simplified Management
From the Discounts page in your Shopify admin, you'll be able to update and manage all of your existing discounts. But attention! Before making changes, check to see if another team member is making adjustments to the same discount.
Types of Discounts at your disposal
Do you want to promote sales, offer special offers or reward your customers' loyalty?
You can create discounts for orders, products or shipments. From buy X get Y codes, to automatic discounts and free shipping, the flexibility is yours to explore.
Effective Discount Code Management
Whether for products, collections or variants, you can offer discounts adapted to your strategy. Configure details such as validity dates, usage limits, minimum order amounts, and applicability to specific products.
Discount Sales Report
Once your discount codes are active, use the Sales by Discount report to track their performance. Gain key insights into usage and adjust your strategy as needed.
Important considerations:
Before you dive into creating discount codes, keep in mind things like usage limits, maximum number of codes, and special characters in code names to ensure a smooth experience.
Automatic Discounts for a Sophisticated Touch
If you're looking for a smoother shopping experience, automatic discounts are your solution. Automatically applied at checkout and in the cart, they offer a touch of elegance and comfort to your customers.
Combining Discounts for Greater Impact
Don't limit yourself to a single discount, on Shopify, you can combine discounts to maximize their effectiveness. Whether it's one amount, free shipping, or the classic buy X get Y promotion, the options are limitless.
At Shopify, discounts aren't just numbers, they're opportunities to elevate your marketing strategy.
10. Sales channels

Connect your store to various online sales channels to centrally track products, orders and customers. The platform simplifies the incorporation of new channels, and when you add them, your products automatically become available. Eligibility may require adjustments to your store settings. Review the terms of use for each channel, some have certain requirements.
Individual dashboards for each channel provide detailed sales and traffic summaries. Shopify empowers you to thrive in the era of omnichannel sales, allowing you to grow and excel in diverse online markets.
Online store
Your online store on Shopify is not just a platform, it is the virtual home of your business. By opting for the Shopify Basic plan or higher, you can make the most of this versatile tool to create websites, launch blogs, and, of course, sell your products. The flexibility of your store allows you to customize it according to your needs:
-
Create custom menus and store filters for a seamless browsing experience.
Add a personal touch with a custom domain.
Set up dynamic payment buttons for your product pages.
Design your online store with responsive themes.
The online store setup guide will help you get your platform up and running quickly, but if you need more, the developer tools are at your disposal to create a fully customized storefront.
Once you've set up Shopify, the platform automatically takes care of the heavy lifting: processing payments, fulfilling orders, and displaying your products in your online store. Your store is assigned a unique domain name, based on the information you provided when registering. You can change this domain name once, so choose wisely. Before launching, be sure to follow a few key steps to ensure your store is ready to wow your customers.
Topics
Themes are the key to shaping the organization, features and distinctive style of your online store. Each theme, designed specifically for various niches, offers unique experiences to customers.
Shopify themes go further by providing additional features:
Sections on Every Page: Customize content on most pages, creating unique layouts by adding, rearranging, or removing sections and blocks.
Improved app support: Install or change apps without code, integrating app functionality anywhere in the theme using blocks and embeds.
Richer content with dynamic sources: Enrich the information in your theme by connecting it to dynamic sources, whether it's a resource attribute or a metafield value.
Collection Filtering: Allows customers to filter collections by availability, price, and more.
Boost your business by exploring free and paid themes in the Shopify Theme Store. Customization is easy through the theme editor in your Shopify admin, you can even edit the code if the theme requires it. All available themes are optimized for performance and usability, and are mobile device compatible.
Blog Posts
Enrich your online store with Shopify's built-in blogging engine, a powerful tool to boost search engine optimization (SEO), engage audiences, and generate traffic and sales. The blog setup becomes a link to build a community around your products and brand.
Adding a blog to your online store is simple and effective. Publish articles that not only improve SEO but also tell compelling stories to convert visitors into customers and encourage engagement. Discover how blogging can be a key tool in growing your business by exploring more on the Shopify blog for inspiration.
pages
In your online store, pages are a key resource to provide lasting and essential information. From “About Us” to “Contact Us,” these pages play a crucial role in connecting with customers. Learn how to create, customize and boost your visibility with an intuitive approach. From content enrichment to auto-generation magic, Shopify offers tools to stand out. Discover how to add links, Google maps, and optimize for SEO. Editing or deleting is simple, allowing you to keep your online presence vibrant and up-to-date.
Navigation
Make it easier for your customers to explore your online store through effective navigation. Add strategic menus organize and display links to products, collections, blogs and more. From the Shopify admin, easily customize and manage your menus and links. Define where they will be displayed in your store based on the theme settings. When setting up your store, think about how you want customers to find your products and key information. Discover default menus, such as main and footer, and adjust elements according to your needs. Drop-down menus in the main menu allow for efficient organization. Understand how navigation looks in different themes before choosing the right one for your store.
11. Applications

Discover a world of possibilities in the Shopify App Store, with a variety of apps to boost your business. When selecting an app, ask key questions:
What would complement Shopify's essential features in your store?
How can you improve sales and simplify administration, such as mass printing shipping labels?
Evaluate your needs and define a budget for applications.
Reviews from other merchants in the store offer valuable insights, supporting informed decisions.
Choose apps that align with your goals, highlighting aspects like SEO, marketing, and scheduled sales.
Also, consider ease of administration for a hassle-free experience.
Take advantage of free apps or trial periods before deciding. Remember to uninstall apps before pausing or deactivating the store to avoid unwanted charges. Understand app compatibility with your store settings and tailor your selection to optimize functionality.
12. Settings

The settings panel is where you can configure and customize various aspects of your online store.
Access the Settings Panel:
General configuration
- General: Here you can set basic information about your store, such as store name, address, contact email, and time zone.
- Payment Settings: Configure the payment methods you will accept in your store, such as credit cards, PayPal, etc.
- Shipping Settings: Define shipping rates, shipping zones, and shipping service providers.
-
Tax Settings: Set the tax rate based on your location and applicable tax rules.
Account Settings: Manage your account information, including billing address and contact details.
Store Customization: Adjust the look and feel of your store, such as the logo, colors, fonts, and themes.
Checkout Settings: Customize the payment page, customer account options and settings related to the purchasing process.
Notifications: Set up email notifications for customers and you as the store owner.
Sales Settings: Adjust settings related to order management, inventory, and return policies.
User Account Configuration: Manage user accounts and set permissions for collaborators.
-
Reporting and Analytics Setup: Set up reports and analytics to track your store's performance.
Explore each section to customize your store according to your needs and preferences.
Shopify provides an intuitive, easy-to-use dashboard that gives you quick access to key information about your online store. The interface allows you to manage orders, products, customers and more, all from one place. Plus, Shopify's flexibility to integrate apps and customize your store gives you the ability to tailor it to your specific needs.
The Shopify dashboard is revealed to be a comprehensive and efficient tool for online store management. Its intuitive design and strategic functionalities allow merchants to have complete control over their digital business. From inventory management and product creation to sales tracking and customer experience personalization, the Shopify dashboard offers a complete solution. In addition, its ability to integrate with various external applications and tools facilitates the expansion and optimization of e-commerce. Ultimately, understanding how the Shopify dashboard works is essential to making the most of this platform and boosting the success of any business in the online world.
My name is Chris Uzcategui and I am here to share my passion and knowledge with anyone looking to start their online business from scratch.
I have been working in the world of E-commerce for more than 9 years and I am proud to say that I have achieved more than 90,000 annual sales with Shopify, Amazon and Etsy.
My experience spans a wide variety of strategies, from print-on-demand and dropshipping to creating digital products.
My goal is to share my knowledge and experience with everyone. Whether you're just starting out or you're already established, I'm here to help you grow your business.
Subscribe to Our Community of Entrepreneurs
And receive weekly Tips with the business strategies that are trending
Follow me on Instagram for daily tips: https://www.instagram.com/chris_uzcategui/
And subscribe to my YouTube channel to learn Step by step: https://www.youtube.com/@chrisuzcategui/videos
Products Featured In This Blog
Lorem ipsum dolor sit amet consectetur
Lorem ipsum dolor sit amet consectetur adipisicing elit. Illum neque eaque, autem sit soluta, voluptatum libero magnam tempore ullam at harum vel, ad reprehenderit, nemo veniam quas in voluptas hic. Lorem ipsum dolor, sit amet consectetur adipisicing elit. Natus id officia omnis suscipit aut architecto repellat a quia eaque reiciendis blanditiis perferendis hic, nihil, mollitia. Iste velit aperiam, numquam dolorem.